Wednesday, January 30, 2008

Thursday Tech's


It's Thursday again already! I need longer weeks or something...LOL I did a technique I haven't done in a long time. It is called Chalk Dusting with Baby Wipes. It is fun but a little messy. Here are the directions:
Chalk Dusting with Baby Wipes
White matte cardstock
2-3 colors of loose chalk or finely ground chalk
Clean wet baby wipe
Stamps and inks of your choice
Heat gun (optional)

Sprinkle 2-3 colors of chalk randomly onto white cardstock. Use the baby wipe and rub the chalk into the cardstock. Be sure not to rub hard enough to rub a hole in the paper. Dry with heat gun if necessary. Stamp and embellish to your liking.
I hope you enjoy it and get a chance to try it.

Friday, January 25, 2008

Where did the week go?

I started watching my grandkids again this week. My daughter went back to work Tuesday after being off on maternity leave. I now have a 17 month old and a 7 week old baby everyday. I get my granddaughter off to school every morning too. I now realize why we have our kids when we are young...LOL
Anyway I have done a little stamping and also held two classes this week. I am teaching two mini classes tomorrow and a scrapping/stamping weekend event. Never any rest for the wicked. I love stamping so much that it really doesn't bother me to be this busy most of the time. It is when the creative juices quit flowing that drives me crazy.
I made this Valentine Card using the Cuttlebug embossing templates, 36 guage tooling foil and cardstock. The embossing templates work really well with the metal. I love how it turned out. I added a small ladybug button I had on the card also. I hope you enjoy it!

Here is another card I did using the same heart. I love that set and I also like doing the Rock N Roll technique with it. I am doing a Make & Take tomorrow with this card. I think the people that will be here have not heard a lot about The Angel Company so I want them to be able to play with the stamps. I threw a technique in there just because I love doing it. I used our new Amberly Grace paper, cardstock and the ink colors they said would match. I really like it. I also like the new word set Just Because. I have been using that a lot also. I need to move on to other stamps. Of course I need to get them cut first.
Have a great weekend. I hope to be on some Sunday. I have to get my technique class ready for Monday and Tuesday first.

Wednesday, January 23, 2008

Thursday's TECH

This technique is an oldie but a goodie. It is Pulled Pastels. I'm sure a lot of you have done this so it may be a reminder to you. For those that haven't it has a WOW factor when you do it. Don't mind my scan....it looks like ink on the card where the saying is but there isn't...must have been in the scan some way. This is done on dark cardstock so it is a little hard to see but great all the same.


Here are the directions:

Pulled Pastels

Supplies
Dark cardstock
Versamark Stamp Pad
Stamps of your choice
Chalks
Sponges or cotton balls

Cover the entire piece of dark cardstock with chalks. Try to use bright or vivid colors. Use a sponge or cotton ball for this application. After the cardstock is covered to your liking with the chalks; ink stamps with the VersaMark pad and stamp onto cardstock. The inked stamp will pull the chalk off the cardstock leaving a clear image.
I hope you enjoy and I will be posting again soon. I have some cards scanned but just haven't taken the time to post.

Saturday, January 19, 2008

Recruiting Recruiting Recruiting

I have to keep telling myself this. I seem to have a hard time getting recruits. I guess I just don't ask like I should. Anyway I have gotten three recruits this month. No I didn't approach them...they approached me. I will say all three of them are first off my friends and secondly my customers. I am so glad they joined though. It is making my Angel family grow. What did happen as I was talking to Kathy and Sylvia about joining was a surprise to me. Both of them thought you had to sell sell sell. They had went to The Angel Company Website and read about getting their wings. One of the things that had confused both of them was the Perfect Start Program. This is a program where you can earn extra free stuff by meeting particular goals that TAC sets. They thought they HAD to do this. I set them straight and told me no and how easy it is to meet your minimums and sell with TAC. Both of them said I should post what we talked about since there may be more that thought the same thing. So...I am here doing what they have told me to do...LOL.
It is so easy to be a TAC Demonstrator. Here is some of the criteria:

EASY MINIMUMS.....$100 quarterly...that's right an average of $25 per month!

FRIENDLY AND HELPFUL HOME OFFICE STAFF...If your upline is not around and you need to quick answer they are always there to help you. They have always been so nice to me.

GREAT ANGEL FAMILY...You meet so many great demonstrators that are willing to share and help you.

COMMISSION...You make 25% on your sales. Great way to save some extra money to help support your habit, help with household finances, save more missionary trips (Go Kathy). TAC send out commission checks twice a month to the qualifying Angels. You qualify as long as you have retail sales in any amount.

LOW FUNSHOP (PARTY) MINIMUMS...$100 constitutes a party. That's right your hostess (or you if you are taking up orders) will get all the benefits at $100.

FREE GWP'S WITH EVERY $30 IN ORDERS...This is for anyone who places an order and it totals over $30 (before shipping and tax). This is a Gift With Purchase and it is a small stamp FREE just for ordering $30.

Here is the link to check out what TAC has to say about earning your wings. This is also the next link which shows the application for becoming an Angel.

If this sounds like something you would like to try....PLEASE contact me to become part of my team. I want to try and make EXECUTIVE by SEMINAR which is in June 2008. In order to do that I need 10 more recruits. I keep telling myself: I CAN DO IT!!!!!


Wednesday, January 16, 2008

Thursday Tech's!!

It's Thursday which means it's time for another technique. I hope you all are enjoying the techniques and will keep coming back. The technique I picked for today is "Dry Embossed Copper Tooling Foil". If you don't know what Tooling Foil is; it is a metal that is used for crafting. It comes in different size guages. I like 36 guage the best. I buy it in a roll because it is more economical. It is sturdy enough to work with but yet soft enough to cut with scissors. This is what I used in this project. You can also get copper sheets. Do check the guage so you don't get anything to thick. Remember the lower the number the stiffer the metal.

Here is the sample I made:


The flower is done in the dry embossed method which is in the directions below. I also punched a scalloped circle out of the "foil" to put behind the flower.


Here are the directions:


Dry Embossed Copper Tooling Foil
Supplies:
Copper Toiling Foil 36 gauge cut to size of stamp
Black StazOn pad

Image stamp with nice defined lines
Stylus Pen for dry embossing
Soft mat such as a mouse pad or piece of fun foam
Paper Towel
Foam tape or Pop dots
Cigarette lighter (optional)
Stamp image onto copper foiling with the StazOn pad. Lay image with stamped side up in piece of fun foam or mouse pad. Using your stylus; trace the stamped lines. Turn image over and trace inside of the embossed lines you just made. Turn back over and see embossed image. Use as an embellishment on your cards or scrapbook pages. I adhere the image with foam tape or pop dots. At this point you make take a lighter and burn the copper for a more antiqued look.


I hope you give this technique a try.

Saturday, January 12, 2008

Blog Candy WINNER

Although I didn't get anyone to send me some good project I ideas I did get some comments on my post so I am drawing for the Blog Candy anyway. The winner of the Blog Candy is Channie. Channie please email me with your snail mail addy so I can get this out to you!!! CONGRATULATIONS!!!!!!

Happy Saturday!

I have been working on my class samples for this week and thought I would share. We are doing Winter Themed cards for any Occasion. We might as well get the most use out of our "Snow" type stamps. Below are a couple of quick and easy cards:
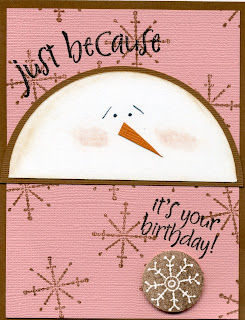
The blue card is done with the TAC stamp set Snowy Swirls. I used a snowflake brad that I already had for an embellishment. A very quick card. The pink card is done with the TAC stamp sets Just Because and Simple Snowflakes. I used the Coluzzle system for my snowman and the mat behind him. YOu can't see the shading on his face in the scan but I did shade around him and put some little cheeks on him.
A lot of the TAC Demonstrators are in San Antonio, TX for our Winter Celebration called ESCAPE. Unfortunately I didn't get to go so I have to stay home and play. I hope everyone that went is having a good time and learning lots of neat things to share with us at home.

Thursday, January 10, 2008

Thursday Tech Week 2

I hope you have come back to check out the Thursday Technique. This is a very simple technique that I love to do. It is called Rock N Roll. It gives your bold image stamp a new look within seconds. You will love doing it if you try it. Here is the sample card I did. I am stuck on greens and blues for some reason and also this butterfly. I hope you enjoy the sample. I have also added my Rolodex card sample for you to see.


Here are the directions on how to do this technqiue:

Rock N Roll
Supplies:
Matte cardstock light colored
Bold imaged stamps of your choice
Two color values of ink pads that compliment each other
Ink image in the lightest color value first. DO NOT STAMP!
Now roll the edges of the inked stamp onto the complimenting color of stamp pad. NOW STAMP ONTO CARDSTOCK!
Wipe stamp off and repeat as necessary to get the look you want to achieve.

You can wipe your ink pad off with a paper towel if you get too much of the other color onto it. This technique will not hurt your ink pads. I do it all the time. As long as you wipe the ink off the ink pad if it gets too messy you will be fine.

Monday, January 7, 2008

OH MY GOSH!!!!

I just had to come here and tell everyone what happened at my class tonight. I only had three people in class (thank goodness). I teach in part of my basement and I take 6 people but it is crowded so we were lucky. Anyway I am just talking away (standing up) and one of the ladies looks up and says "Is that a bird?" Another lady says (in a shrill voice) "No!! It's a BAT!." She proceeds to hunker to the floor. When she does that I can't get around her. I scream "MOVE!!". She moves and we all run out of that part of the basement yelling at my husband "There's a bat in there." He, of course, calmly gets his fishing net out and goes in my stamp room and catches the thing. It looked about 3 inches long in that net. When I saw it flying I thought it had a wing span of at least 12". LOL WE laughed the rest of the night in class. It is one of those stories that I guess you had to be there but it was pretty funny. Mind you I live in a subdivision so it's not like we have a lot of woods or anything. Now to figure out how he got in here. I hope he didn't have any friends with him.
I'll be back with some stamping stuff in the next day or so. Have a good one!!!!

Sunday, January 6, 2008

Happy Sunday

I hope everyone has enjoyed their weekend. I should be upstairs getting ready for my Team Meeting that I am having today but I wanted to come down and share one of my cards I made for my class this week. We are doing a class on cards with different folds which means cards that don't just open the normal way of an A2 card. This is always a fun class and it give me a challenge to find new ways to do a card. I called this card a Pull Up Card. I gotthe idea for this card at our last TAC Seminar in June 2007. I am so sorry I don't remember the first name of the Angel that did it but her last name is Thiel. It was given to me as a trade. Here is my version of her card and what we will be doing in class Monday and Wednesday night.

This is the front of the card. I purposely made the card pretty plain as I want to do different folds in the class so the cards are really basic so the ideas can be taught.
Here is the card open. As you can see it has two little pull ups. You can see in the picture of the front of the card that it has a slot to pull up on the back pull up and the little pull up will come up at the same time. It is a cute and fun card. Hope you enjoy it.
If you haven't read my previous post please do so. I am giving blog candy away. What you have to do to have your name put in the drawing for the candy is to email me a card or project that you think would be a good one to do at a weekend retreat. I will draw a winner Friday January 11th.

Friday, January 4, 2008

WOW

I can't believe all the traffic that has traveled across my blog. It is amazing. I first of all want to thank everyone for stopping by. I hope all of you enjoyed the technique and the idea of the Rolodex. I hope you get a chance to try it.

I am hosting a SouthWest Ohio Angel Gathering for demonstrators with The Angel Company. It will be a lot of fun. If you live in the general area and are a demonstrator with The Angel Company and would love to come, email me for the information.

I am working on projects for the gathering. If you have a really neat project and would want to share with me please email me. I would love to see it and if I happen to use it I will give you credit. I have a lot of ideas but would love some more.

To make this a little more interesting I will give some blog candy. Here is a picture of the candy:

This is 7 Rolodex Technique cards. I will pick the winner on Friday, January 11th. I hope I get lots of ideas and good luck.
I guess I will get off and work on some more ideas. Thanks again to everyone for stopping by.

Wednesday, January 2, 2008

Thursday Tech's

First of all I want to show you how I file my technqiues. I use a 3" x 5" Rolodex File. It is a little pricier than the smaller one but you can get more of the technique on a card. I file all of my techniques in alphabetical order. I make a sample of the technique and it goes on the front side of the Rolodex card. I then type the directions and put it on the back side of the card. That way while I am flipping through the Rolodex I can see the samples. If I come across one I like and haven't done in a while I can pull it out, turn it over and have the directions right there. This is also a great size to sit on your desk and have it close at hand. No more having to go through samples and samples of cards to get ideas. Here is a picture of the Rolodex File:

As you can see I have had to go to two Rolodex systems. I have part of the alphabet in one and the rest in the other. They stack really nice to
keep the area small where they sit.


This is how the Rolodex cards are done. As you can see the sample is done on cardstock and then mounted to the Rolodex card. On the back of the card is the directions that were typed to fit the size of the rolodex card. It was printed onto copy paper and then glued to the back of the Rolodex card.

I buy Rolodex protector sleeves from Discount Office Supplies and put over the cards. That way if I am using a card it is protected from the mess I can make. They also have good prices on their 3" x 5" Rolodex Boxes.


Now to move on to our first technique. If you are an avid stamper you have probably seen a lot of the techniques. I am NOT the creator of these techniques. You can search and find techniques all over the internet. However I am the creator of the directions because I write them on how I do them. Some of my techniques may have changes to them from how you have seen them. If I think something is easier done another way from the directions I have found on the internet then I change to how I like to do it.

Our first techniques is called: BEADED WINDOWS

Here are the directions for the technique:

Beaded Windows
Supplies
Cardstock colors of your choice
Stamps of your choice
Inks of your choice
Square or Rectangle punch or coluzzles for cutting window
Small Beads, Scotch Tape
Beading wire such as Beadalon 19
Cut or punch desired window size from card front. Measure the length of the “window”. Cut four strips from a contrasting cardstock ½” wide and then the length of your window plus a ½”. Glue the small pieces of cardstock to the back of the window to make a window pane. It gives the window a nice finished look. Tape a piece of bead wire to the back of the window. Make sure it is long enough to cover the window from one side to the other. String beads onto wire and tape to other side of window. Repeat this step to add another string of beads to window. Stamp image onto a separate piece of cardstock to show through the window. Tape to back side of window.

Here is a sample card:


I did the beads in lighter colors so it is hard to get the true effect. I will also post the Rolodex sample that I did a long time ago.


Tomorrow is the Day!

I will be showing my system of cataloging my techniques. It makes it so easy to have them at hand when you are wanting to do something a little different. Ihave had this opened up to TAC Angels for a couple of years. Many of them have done really well with classes. I have decided to expand my sharing of the love of stamping by sharing my technique ideas and how to fit them into classes. See you all tomorrow!!!